Finally think I've got it set up; still have to transfer the old one to where the kids one is atm, hook this up to the printer, the USB hub (3ports are not enough), screen, mouse and keyboard. The laptop keyboard is not user friendly and on top of the desk is too high for me to use comfortably.
No crafting today as I spent most of the day copying files to the portable hard drive, then copying them to this pc; plus trying to get Thunderbird working properly. In the end I found a wonderful suggestion on the Thunderbird forum that I should install Tb, but not launch it. Copy and paste the whole Thunderbird profile from the Users Folder and then paste the whole thing into the Roaming section in users on Windows 7 before launching Tb; worked a treat!
We did take a small break this afternoon for a family walk; Thomas treated everyone with an icecream or iceblock; I tried to say no; but in the end I caved as the dairy had caramel icecream. Don't think I'll lose any weight this week somehow; got to get back to the running tomorrow. Have to take steps; things are getting tighter, this is not a good thing. While we were out I got the opportunity to try a couple of photo's with my new phone as the boys are totally immersed in watching the local carwash at work
Got another appointment with my herbalist tomorrow; Ian's got one with the dentist; so glad dentistry for wee ones is free.
Sunday, November 06, 2011
Saturday, November 05, 2011
Full on!
Very busy today. Started by going to the guild for a lovely mornings spinning. I took Sheepie who was much admired; apparently I'm the first to finish using my challenge fibre.
Today I should have been spinning my cotton but instead I decided to leave the swearing at home and took in some of Pat Bradshaw's batts to spin. This particular lot is not really a batt; it's more of a roving and is a blend of Alpaca/Kid Mohair and Merino. Not quite as fine as what I normally get from her, but lovely in its own way.
Roving:
The blue bits are the mohair and they're working out really nicely. Here's the first lot of singles, not finished as I still have some fibre in this bag; and another bag yet to go.
You can see my full circle skirt there; I've got some photo's of that, not very good ones unfortunately as my camera doesn't do action shots very well and there was a lot of wind that day!
I was twirling too, as you do with a full circle skirt; lol. Another shot gives you an idea of what it really looks like, but in this one the light was bad, sigh.
This afternoon was very busy indeed. Ian had his two birthday parties and Thomas had to go to his nephew's 21st. I got Ian to his first party which was a Harry Potter themed party; he came back with a dragon egg which he gets to hatch in a few days; and he has a potion too; no idea what that does. His second party he was late to, but he and they didn't mind. He had a BBQ tea there and got to watch fireworks; boy was he bouncing when I arrived to pick him up! Right now both boys are watching next door's fireworks through their window; only downside is we don't know where the cats are. Really hoping they're ok!
Thomas went to the 21st after dinner and got back before I picked Ian up, so that worked out well.
In other news I'm attempting to set up the new computer; Firefox is up and running, Thunderbird is being a stubborn so and so and refusing to accept the original profile from this computer. Might have to delete the whole thing and start again I think.
And last, but not least, I'm no longer using toothpaste. Now, before you go "ick" let me explain. I've made some tooth powder and I think it's working just as well and it's cheaper. It's not mint flavoured, this is cinnamon and once you get used to the flavour it's rather nice. I got the recipe from Wendyl Nissen's "A Year of Living Like my Grandmother".
Friday, November 04, 2011
Of fabric, noses and baking
I got home from the school run just in time, my phone was delivered! It's all charged now and waiting on Telecom to switch it over so I can download some apps and get the rest of it set up; so far it seems fairly intuitive which is good as the manual isn't the best I've ever seen.
1st thing I did today aside from the usual getting kids to school and going to work was to pay a visit to Stitch in Colombo St to see their sale. I didn't spend much, but I did get 2.5m of fabric plus a free fat quarter.
My favourite is the colourful owls on their navy background. The tan will be going with the owls even though I'm not sure what I'll be making; the salmon will join the stash and the more subtle owls will go with the main owls somehow. I think I might be envisioning a cushion cover even though we don't normally use cushions.
I might have spent a bit more today too; a grab bag of Timberland clothes for the boys off the NZ sale website and some probiotic products for the boys and me. Going to try them on Ian as there's been some research on ASD children and probiotics with positive results. Hadn't been planning either purchase, but it's worth it I think. The fabric came out of my remaining cash reserves.
I've finished my circle skirt too, no photos till Thomas gets home I'm afraid.
I picked up Ian from school as normal and the plan was to go to the gym from there; unfortunately the gym was not to be. Apparently he tripped earlier in the day and went nose-first into a metal bar; ow! There's swelling and apparently a little blood at the time, I don't know if he's broken it or not, but I figure gym is not a good idea less than 2 hours after that sort of thing. Instead we just came home and he's getting some computer time while I make pikelets. I don't make standard pikelets, these are golden syrup pikelets from a recipe my family has used for years. At the request of Nicole (Casper on Twitter); I'm posting the recipe for you.
Golden Syrup Pikelets:
1 cup plain flour
1 tsp cream of tartar
1/4 cup sugar
3/4 cup of milk
1/2 tsp baking soda
1 egg
1 dessertspoon butter
1 tab golden syrup (I often use more than this)
Sift flour and cream of tartar, add sugar. Add beaten egg and milk in which soda has been dissolving and mix. Melt butter and syrup together and add. Mix well, but do not stir after commencing to cook pikelets.
My lovely kitcheaide is doing the hard work as you can see. Your batter should be smooth; no lumps.
Start to put tablespoons of batter in your preheated frypan. I'm using my stainless steel electric frypan for this as it has plenty of room. I used to butter it up first, but find that's not necessary and can cause burning.
after they've been in a wee bit they'll start to bubble a bit; once a fair number of the bubbles have burst through the top it's time to turn them; this one's almost there:
A few minutes later and they're half done; at this point you can't rely on bubbles to see if they're ready. I have a feel for it now, but you could put the fish slice under them and check.
And finally, all done!
This is halfway through the baking, at the end of it there's actually less as the boys keep taking them to eat, lol. I might have had a few too.
Oh, and Ray wanted to help; it seems the best way to help if you're a cat is to ask for pats
It is so hard to get a decent photograph of a black cat! I didn't give her pats though as then I would have had to wash my hands again. Now I'll reuse the frypan for dinner; we're having homemade burgers. Using multigrain buns from Bakers Delight, mince from the butcher mixed with egg and honey and maybe a little salt; homegrown lettuce, bought tomato, cheese and ham. Thomas can cook his when he gets home since he'll be late.
Thursday, November 03, 2011
Taking the good with the bad
I've got good news and bad. Good is I got an email this morning from EQC and they're paying out our contents! It's not in the account yet, but I'm hoping it'll be there tomorrow. Still have some bills to send them for emergency repairs too; really should get that done. In fact I'll do it today and post it tomorrow morning.
Also good is George is now discharged from the eneurisis clinic as he now wets once a month or less often at night! Bad is Ian has gone backwards and now wets 2-4 nights a week, so have now asked them to put him on their wait list; going to take him to Dr Sharon our chiropractor next week to see if that helps as nothing has changed at home or at school as far as I know. Other bad, Ian has a really nasty cavity in a back tooth that I'd not spotted; half the tooth is gone so I suspect it'll have to get pulled on Monday when he goes into the dental service. I'm feeling like a bad mummy for not having spotted it and also for letting him brush his own teeth
. Also his front teeth are starting to move forward due to the thumbsucking. I've just ordered a thumbguard to stop him from sucking his thumb as he has no great desire to stop; hope it works and doesn't cause behavioural problems
Last night I cast on Ian's next jersey; this is something I'll do a bit on from time to time as I'm finding the yarn quite hard to work with; hopefully it'll get better when I go to the 4.5mm needles which are a little smoother than the only pair of 4mm needles I have. The yarn is basically a softly spun wool with 2 binding threads holding it in place; looks a bit like a boucle; but isn't a true one. Ian loves the colours though so I will keep at it.
I'm thinking I might change the pocket to a kangaroo style pouch; just have to work out the maths for that one.
Oh, and while I was writing this there was a call from the front door; my friendly local courier was there with this:
I wasn't expecting this till tomorrow, but it means I can get it set up tonight all going well and hopefully then remove a lot of stuff from this pc for the boys. Don't tell them yet though; till it's all done they won't know
Also good is George is now discharged from the eneurisis clinic as he now wets once a month or less often at night! Bad is Ian has gone backwards and now wets 2-4 nights a week, so have now asked them to put him on their wait list; going to take him to Dr Sharon our chiropractor next week to see if that helps as nothing has changed at home or at school as far as I know. Other bad, Ian has a really nasty cavity in a back tooth that I'd not spotted; half the tooth is gone so I suspect it'll have to get pulled on Monday when he goes into the dental service. I'm feeling like a bad mummy for not having spotted it and also for letting him brush his own teeth
Last night I cast on Ian's next jersey; this is something I'll do a bit on from time to time as I'm finding the yarn quite hard to work with; hopefully it'll get better when I go to the 4.5mm needles which are a little smoother than the only pair of 4mm needles I have. The yarn is basically a softly spun wool with 2 binding threads holding it in place; looks a bit like a boucle; but isn't a true one. Ian loves the colours though so I will keep at it.
I'm thinking I might change the pocket to a kangaroo style pouch; just have to work out the maths for that one.
Oh, and while I was writing this there was a call from the front door; my friendly local courier was there with this:
I wasn't expecting this till tomorrow, but it means I can get it set up tonight all going well and hopefully then remove a lot of stuff from this pc for the boys. Don't tell them yet though; till it's all done they won't know
Wednesday, November 02, 2011
A Finished Object!
First up is one that my Father-in-law made for me; this is to help me when I'm darning socks; it's a sock egg made from a random bit of wood he had in his stash. It is cracking slightly on one side so I hope that doesn't get any worse, if it does he's promised me a new one, I hope this one stays ok though as I love the grain on it.
I can't test it yet as all my socks are currently in one piece; but I'm sure it won't be long before I need to use it.
My finished object is Sheepie. I'm not going to do a lamb just yet cos for some reason Sheepie has always felt like a boy.
Isn't he lovely? I really like his eyes; real sheep eyes. I think he'll go in the sewing room to keep an eye on my fibre. One nice handspun and handknit sheep with a little commercial yarn and some embroidery floss.
Tuesday, November 01, 2011
A new phone
I'd put off ordering my new phone in the hopes that the price might have dropped in November; went onto the Telecom site this morning and it had! The phone I wanted was originally $349 before taking any discounts for 24 month contracts; $249 after that. When I went in this morning it had dropped down to $199; so I was expecting to pay $99 to get the phone. I went to set it up with the 24 month term and it was free!
This is what I'm getting:
It's the LG Optimus One P500. It has everything I need including a semi-decent battery life; a good camera for a phone (better than an Iphone) and I know people on The Nappy Network forum who have it and like it. Not having to pay for it (aside from the monthly fees) also means I can start saving up for a new camera as I really want a DSLR as the point and shoot we currently have doesn't really cut the mustard for good project shots for my knitting and spinning.
I've got some knitting done today too, Sheep has his legs attached now, still needs head, ears and fluff on his head.
He won't stand up, but that's ok; he's having a rest. Maybe I should decide he's a she and do a wee lamb; what do you think?
Oh, and this is my 100th post this year! I think that's pretty good. Tomorrow I might do a book review of my latest arrival; keep you all on tenterhooks.
Monday, October 31, 2011
A very busy day
EQC this morning, we're more than likely going to be a managed claim. Most of that is due to the garage damage. They couldn't see if the back wall is damaged (too much stuff) so whether it can be repaired or rebuilt depends on that; which Fletchers will have to decide.
No knitting today, what with EQC and work there wasn't any time. So much for our anniversary, lol. 19 years if I calculate correctly; no mean feat in today's world, especially considering we still love eachother despite health issues and ASD children.
Speaking of ASD children today was their first day of soccer; George really enjoyed it, well he did up till Ian tackled him (wrong game Ian) and then bounced up and down on George. It was a hot day so that combined with Ian's bounce and a lack of afternoon tea resulted in George being unwell. He's fine now luckily. Ian stopped playing near the beginning, but was persuaded to try again by a very pretty teenage girl (he likes girls) and had a great time!
Oh, and before I forget, we have a laptop coming to replace this computer so this one can replace the boys computer which is dying. It's not brand new, it's a reconditioned one that 1-day.co.nz had up today. Thomas has always wanted a laptop and this is a quad core one which should well and truly do what we need. It has a slightly slower CPU than this, but the quad core should be better than a dual for what we do. Gaming is not something we do at all on the PC anymore now that we have the Xbox.
Sunday, October 30, 2011
No photo day
Not much choice on the no photo's thing. Thomas has still got the camera at his wargaming thing. I've almost finished the Dalhousie mitts; 21 more rows to go and then they're all done!
I'm all done in though; spent the morning doing things like washing, dishes (which T didn't have time for this morning) and gardening. Still, the veges are all in aside from spuds; the weeding is closer to done and all I have left to do tomorrow morning is to do a quick once-over with the vacuum cleaner once the boys hit school.
Ian's got swimming at school next week; T will be going in with him for at least the first morning; I'm not allowed in the pool within 2 weeks of an IBS attack so I can't. If things go well tomorrow and it turns out Ian's ok without T in the water then he won't keep going, his teacher aide is all set to get in the water on Wed and Thurs, but it's a different person the rest of the week. I'm going to suggest he meet them at the pool so he can leave as soon as the swimming is finished and he's dressed.
Only one more day left in Blogtoberfest; hopefully tomorrow I'll have some idea of where we stand for the house with EQC. Might not though, our neighbours didn't get given any indication when they got assessed last time and that was 2.5 months back; they've just had a letter to say it's a managed claim. They would have preferred if it was under the 10k; but we don't always get what we want.
I've got a list for the EQC guys, I'll be following them around to make sure they pick up what I already have and asking if we're over or under the 10k. Got copies of insurance (though it's last years invoice) and rates; plus can show them the insurance payments going out of the bank account if there's any issues. I tried to ring the insurance company to get a more recent copy of the invoice, but after 20 minutes on hold I gave up in disgust. Even if it's over 10k I'll just be glad to have moved along in the process just one more step. Should get paid out for the contents next month too, then that money can go against the mortgage, originally the money for the washing machine would have gone on the mortgage so things will even out aside from interest. Wish us luck!
Saturday, October 29, 2011
Tutorial for needle holder
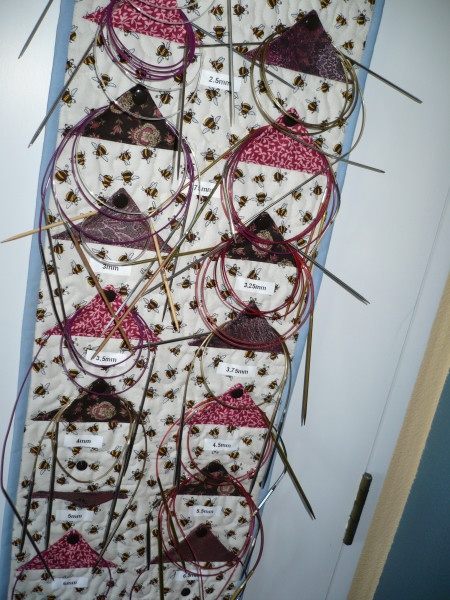
First up I want to say I could have done this better; more piecing and the triangular needle-holders would have looked better; but I didn't plan that far ahead. Continuous binding would have been better too; hindsight is definitely a good thing; next time I will make changes to include these observations. Overall though I'm quite happy with it; it does the job nicely and you only notice the edges of the triangles if you look closely.
The important bits first:
Finished size for mine was 39.5" long and 10.5" wide, including binding. I use a combination of imperial and metric measurements as I go, sorry, that's just how I am.
Materials required:
Foreground fabric - prewashed
Batting (I used a polyester batting that was fairly firm)
Backing fabric - prewashed
Scrappy bits to make the triangles
Binding (I used more of the backing fabric)
Thread
Snaps
Dowel about 2.5" longer than your quilt is wide; I used one that was about the thickness of a pencil.
Tools required:
Sewing machine
Freemotion or darning foot
Walking foot is handy, but not a must have
Snap press. I have a Kam snap press which I use on the resin snaps; you could use the plier type on the metal ones instead.
1. Press your backing and foreground fabric. When I say press I mean place the iron on the fabric after smoothing it with your hands, lift it and place again next to where you started; keep doing this till the whole thing is pressed. Don't iron (sliding the iron around the fabric) as this can take your fabric off grain which is a bad thing. This is my ironing station; it's kept in the sewing room and consists of an ancient ironing board with a Singer steam station; which is brilliant! I also have a steam press on the other side of the room, but that's not normally used for quilting.
2. Lay batting on backing, then foreground fabric over the top of the batting and pin all 3 layers together, sandwiching the batting in between the other 2 layers.
3. Trim close to size; my batting was cut square at the quilt shop; and I did check before trimming my fabrics to slightly bigger than the batting.
4. If your scraps haven't already been prewashed then steam press them to preshrink the fabric. Mine hadn't been washed so I did this; it means that if I have to wash the needle holder for any reason the fabrics have already been shrunk so there won't be any puckering.
5. At this point I paused in my endeavors to clean and oil my machine. I like to do this fairly regularly, especially as my machine (which is owned still by Mum) isn't one I can easily replace and parts are no longer available.
I give her a dust on the outside, then I remove the bobbin and clean that area out properly with the brush as you can see. I put a drop of oil at the bottom of the bobbin casing and then oil all the red bits in the top as well. A fresh needle, put everything back together and I'm ready to proceed.
Please make sure you take this step before you start a new project; it will keep your machine running smoothly for a lot longer and reduces wear on parts. This is important for obvious reasons. I also make sure I turn the machine off at the wall if not in use, these old Bernina's have been known to blow a capacitor in the foot control which then means they will run even if you're not there; this could start a fire and even if it doesn't it's not good for the machine to be run at full speed with no breaks until you hear it and stop it.
6. Add lots more pins. I'm using quilters safety pins; they have a curve in them which makes them work really well for thicker items. I don't want this shifting around as I quilt it.
7. Other methods for keeping the layers together include quilters basting spray, or you can get tag guns which will work well too. For larger items I'm tempted to try out the basting spray, otherwise I'll have to buy a whole heap more of the safety pins.
8. Time to free-motion quilt. I followed the directions in one of my quilting books which said to drop the feed-dogs and quilt in preferred pattern. As it was my first time I went random stippling. Since making this I've found a blog on free-motion quilting which says not to drop the feed dogs as it causes tension issues (you can see that she was right, I've got lots of tension issues on the back in the last photo). She takes her stitch length to 0 so the feed dogs aren't really doing anything and finds that works much better. She also has a whole heap of free-motion designs on her website. I ended up ordering the gloves and teflon sheet that she sells for when I get my King-sized quilt to that point.
9. Trim quilt to finished size.
10. Cut binding to 4 times preferred finished width (for 1cm binding, cut 4cm wide).
11. Pin binding to edges, right sides together, raw edges matched.
Sew in the same direction for both long edges; this is especially important if you're not using a walking foot as the top layer will tend to walk forward slightly as you sew.
12. On right side press batting away from quilt, fold to wrong side. On the back turn under a small seam allowance to hide the raw edges (making sure that the back binding is slightly wider than the front) and then stitch in the ditch to secure (stitching in the ditch means you're stitching right where the binding meets the quilt; if you're good it shouldn't be easy to spot the sewing; I'm not quite good enough on this, but close). If your binding is continuous then a mitred corner would be tidier than my corners which I sort of bumbled through.
This part could also be hand-sewn, but I'm too lazy for that.
13. Cut double the required number of finished tabs. Mine are 4" square. We wiull be sewing theses together, then cutting them in half to make the triangle tabs.
14. Put 2 squares together, right sides facing and stitch all the way around taking 1/4" seams. A walking foot is very handy here.
I always press seams after stitching to set the stitches in place. This comes from my clothes sewing background, but I think it's a good idea even for quilting.
15. Cut each square in half on the diagonal. I used shears, but it would be more accurate to use a quilting ruler and circular cutter. I did mention before that I'm lazy, right?
16. Trim corners and turn right side out, press.
17. Choose your snap colour. I found 3 options I was looking at. A dark brown, a burgundy and a sky blue. I ended up going with the dark brown as it seemed to work best to me.
18. Snap female snaps to triangles.
19. Lay out triangles how you want on the quilted runner I'm doing them so the point will be facing up after being sewn; at the moment they look like it's pointing down. The top ones will touch the binding, there is 1" between each level once complete. Measure and pin in place. I used a quilters ruler to keep them parallel.
Sew 1/4" from raw edge.
Trim those corners you see sticking out and then press triangles towards top. Keep the iron away from the snaps; it will melt them (whoops!)
Stitch just inside the edge of the triangle bottom; this will keep it facing the right way and also help stop the raw edge from doing anything silly.
It also makes it look tidier; see?
20. Measure mounting sleeve, you want this on before doing the male snaps on the main section. I cut the mounting sleeve the same width as the quilt, it will end up 1/2" narrower after seaming. The length needs to be 8 times the finished depth. In my case it was 8"x10.5".
Fold lengthwise, right sides together and stitch a 1/4" seam. Trim corners, turn right side out and press.
21. Pin to back of quilt with raw edges even with binding stitching. From right side stitch 1/4" away from stitching on quilt body side (not on binding side). Make sure not to catch the triangular flaps, and using thread to match the front of the quilt.
You can see here where I'm sewing.
Press up, stitch on binding stitching line from right side; this is the wrong side showing here; this is hiding the raw edges.
Turn down again but not all the way this time, and stitch on the binding line again, making sure to allow enough room for your dowel to be inserted. This gives a nice stable hanging sleeve as you can see. You could do this by hand instead if you didn't want the sewing showing on the right side. I'm sure there's a better way to do it, but I was just going for it at this point; the end was in sight!
22. Lay the quilt flat and mark the positions of the male snaps; I used a water soluble marker, but it doesn't really matter as the snaps will hide any mark. I usually put my snap cap through the fabric manually at the mark instead of just letting the snap press do it. I find this means I get the right spot more easily and also it definitely goes all the way through the fabric which is something that doesn't always happen if you just dump the whole thing in the press. I've had snaps and fabric damaged before doing it that way. If the snap doesn't want to get through, try using a tailors awl to poke the hole in the fabric first; don't make it too big though!
23. Iron on size labels. I used my Dymo Letratag to make my labels. The smaller sizes which I have lots of sock needles in had 2 tags each; one for longer ones and one for shorter ones; the bigger needles I don't have many fixed circulars for so they got one each.
24. Hang, add your needles and admire! Mine's on the back of the sewing room door, there wasn't anywhere else to put it.
Subscribe to:
Posts (Atom)