Follow this blog with bloglovin

Follow on Bloglovin
Showing posts with label tutorial. Show all posts

Saturday, October 29, 2011

Tutorial for needle holder

First up I want to say I could have done this better; more piecing and the triangular needle-holders would have looked better; but I didn't plan that far ahead.  Continuous binding would have been better too; hindsight is definitely a good thing; next time I will make changes to include these observations.  Overall though I'm quite happy with it; it does the job nicely and you only notice the edges of the triangles if you look closely.


The important bits first:

Finished size for mine was 39.5" long and 10.5" wide, including binding.  I use a combination of imperial and metric measurements as I go, sorry, that's just how I am.

Materials required:
Foreground fabric - prewashed
Batting (I used a polyester batting that was fairly firm)
Backing fabric - prewashed
Scrappy bits to make the triangles
Binding (I used more of the backing fabric)
Thread
Snaps
Dowel about 2.5" longer than your quilt is wide; I used one that was about the thickness of a pencil.

Tools required:
Sewing machine
Freemotion or darning foot
Walking foot is handy, but not a must have
Snap press.   I have a Kam snap press which I use on the resin snaps; you could use the plier type on the metal ones instead.


1.  Press your backing and foreground fabric.   When I say press I mean place the iron on the fabric after smoothing it with your hands, lift it and place again next to where you started; keep doing this till the whole thing is pressed.   Don't iron (sliding the iron around the fabric) as this can take your fabric off grain which is a bad thing.   This is my ironing station; it's kept in the sewing room and consists of an ancient ironing board with a Singer steam station; which is brilliant!   I also have a steam press on the other side of the room, but that's not normally used for quilting.


2. Lay batting on backing, then foreground fabric over the top of the batting and pin all 3 layers together, sandwiching the batting in between the other 2 layers. 

3.  Trim close to size; my batting was cut square at the quilt shop; and I did check before trimming my fabrics to slightly bigger than the batting.


4.  If your scraps haven't already been prewashed then steam press them to preshrink the fabric.  Mine hadn't been washed so I did this; it means that if I have to wash the needle holder for any reason the fabrics have already been shrunk so there won't be any puckering.

5.  At this point I paused in my endeavors to clean and oil my machine.  I like to do this fairly regularly, especially as my machine (which is owned still by Mum) isn't one I can easily replace and parts are no longer available.
I give her a dust on the outside, then I remove the bobbin and clean that area out properly with the brush as you can see.   I put a drop of oil at the bottom of the bobbin casing and then oil all the red bits in the top as well.  A fresh needle, put everything back together and I'm ready to proceed.

Please make sure you take this step before you start a new project; it will keep your machine running smoothly for a lot longer and reduces wear on parts.  This is important for obvious reasons.  I also make sure I turn the machine off at the wall if not in use, these old Bernina's have been known to blow a capacitor in the foot control which then means they will run even if you're not there; this could start a fire and even if it doesn't it's not good for the machine to be run at full speed with no breaks until you hear it and stop it.

6.  Add lots more pins.  I'm using quilters safety pins; they have a curve in them which makes them work really well for thicker items.  I don't want this shifting around as I quilt it.

7.  Other methods for keeping the layers together include quilters basting spray, or you can get tag guns which will work well too.   For larger items I'm tempted to try out the basting spray, otherwise I'll have to buy a whole heap more of the safety pins.


8.  Time to free-motion quilt.  I followed the directions in one of my quilting books which said to drop the feed-dogs and quilt in preferred pattern.  As it was my first time I went random stippling.  Since making this I've found a blog on free-motion quilting which says not to drop the feed dogs as it causes tension issues (you can see that she was right, I've got lots of tension issues on the back in the last photo).   She takes her stitch length to 0 so the feed dogs aren't really doing anything and finds that works much better.  She also has a whole heap of free-motion designs on her website.   I ended up ordering the gloves and teflon sheet that she sells for when I get my King-sized quilt to that point.

9.  Trim quilt to finished size.

10.  Cut binding to 4 times preferred finished width (for 1cm binding, cut 4cm wide).

 11.  Pin binding to edges, right sides together, raw edges matched.


Sew in the same direction for both long edges; this is especially important if you're not using a walking foot as the top layer will tend to walk forward slightly as you sew.  

12.  On right side press batting away from quilt, fold to wrong side.  On the back turn under a small seam allowance to hide the raw edges (making sure that the back binding is slightly wider than the front) and then stitch in the ditch to secure (stitching in the ditch means you're stitching right where the binding meets the quilt; if you're good it shouldn't be easy to spot the sewing; I'm not quite good enough on this, but close).  If your binding is continuous then a mitred corner would be tidier than my corners which I sort of bumbled through.
This part could also be hand-sewn, but I'm too lazy for that.

13.  Cut double the required number of finished tabs.   Mine are 4" square.  We wiull be sewing theses together, then cutting them in half to make the triangle tabs.

14.  Put 2 squares together, right sides facing and stitch all the way around taking 1/4" seams.  A walking foot is very handy here.

I always press seams after stitching to set the stitches in place.   This comes from my clothes sewing background, but I think it's a good idea even for quilting.

15.  Cut each square in half on the diagonal.  I used shears, but it would be more accurate to use a quilting ruler and circular cutter.   I did mention before that I'm lazy, right?


 16.  Trim corners and turn right side out, press.


17.  Choose your snap colour.  I found 3 options I was looking at.   A dark brown, a burgundy and a sky blue.  I ended up going with the dark brown as it seemed to work best to me.


18.  Snap female snaps to triangles.

19.  Lay out triangles how you want on the quilted runner  I'm doing them so the point will be facing up after being sewn; at the moment they look like it's pointing down.  The top ones will touch the binding, there is 1" between each level once complete.   Measure and pin in place.  I used a quilters ruler to keep them parallel. 
Sew 1/4" from raw edge.

Trim those corners you see sticking out and then press triangles towards top.  Keep the iron away from the snaps; it will melt them (whoops!)
Stitch just inside the edge of the triangle bottom; this will keep it facing the right way and also help stop the raw edge from doing anything silly.
It also makes it look tidier; see?


20.  Measure mounting sleeve, you want this on before doing the male snaps on the main section.  I cut the mounting sleeve the same width as the quilt, it will end up 1/2" narrower after seaming.  The length needs to be 8 times the finished depth.   In my case it was 8"x10.5".
Fold lengthwise, right sides together and stitch a 1/4" seam.  Trim corners, turn right side out and press.

21.  Pin to back of quilt with raw edges even with binding stitching.   From right side stitch 1/4" away from stitching on quilt body side (not on binding side).   Make sure not to catch the triangular flaps, and using thread to match the front of the quilt.
You can see here where I'm sewing.
Press up, stitch on binding stitching line from right side; this is the wrong side showing here; this is hiding the raw edges.
Turn down again but not all the way this time, and stitch on the binding line again, making sure to allow enough room for your dowel to be inserted.  This gives a nice stable hanging sleeve as you can see.   You could do this by hand instead if you didn't want the sewing showing on the right side.   I'm sure there's a better way to do it, but I was just going for it at this point; the end was in sight!

22.  Lay the quilt flat and mark the positions of the male snaps; I used a water soluble marker, but it doesn't really matter as the snaps will hide any mark.   I usually put my snap cap through the fabric manually at the mark instead of just letting the snap press do it.  I find this means I get the right spot more easily and also it definitely goes all the way through the fabric which is something that doesn't always happen if you just dump the whole thing in the press.   I've had snaps and fabric damaged before doing it that way.  If the snap doesn't want to get through, try using a tailors awl to poke the hole in the fabric first; don't make it too big though!

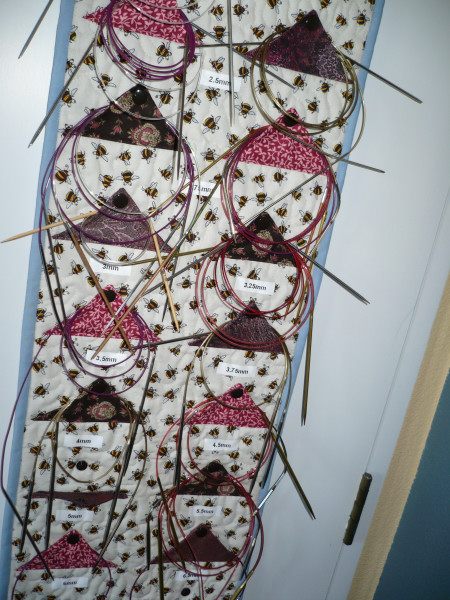
23.  Iron on size labels.   I used my Dymo Letratag to make my labels.  The smaller sizes which I have lots of sock needles in had 2 tags each; one for longer ones and one for shorter ones; the bigger needles I don't have many fixed circulars for so they got one each.

24.  Hang, add your needles and admire!   Mine's on the back of the sewing room door, there wasn't anywhere else to put it. 

Thursday, October 13, 2011

Day 13 - T shirt Tutorial as promised

First up you need a good fitted t-shirt pattern.  The one I have is from the first Ottobre Woman magazine, it's also available as a separate pattern from their Website (2nd from top on the RHS).   For me it's an excellent pattern with a good size range, different sleeve and neckline options as well.   Next time I might remember to add a touch more length, but otherwise it'll do me nicely.

Next choose your fabric; the fabric I'm using is a cotton/lycra blend with a dot print.  It has good recovery and the recommended amount of stretch; it's also fresh and summery.

My method doesn't come from the Ottobre mag or from Kwik Sew; it's just what I've ended up doing after following their instruction before now and choosing what worked best for me.

Now, in my machine arsenal I have a sewing machine (2 actually), an overlocker and a coverhem.   It is possible to sew with just the sewing machine, but I really do recommend an overlocker as well if you can manage it.   On this t-shirt I only used the sewing machine once.
First step for me is to turn up the hems.  I normally sew a 1"(2.5cm) hem but turn up 1 1/4" to ensure that my hem is properly caught on the wrong side.
This is my coverhem, she's a Janome CP1000.  I've threaded her up with normal polyester thread in the two needles and the looper is using woolly nylon; as you can see I've bypassed the tension disc for the nylon as otherwise it'll pull and the hem won't look good.  You may also be able to see I've used a permanent marker to mark the 1" mark on the machine as a guide.  I'm using the left and right needles, not the middle one; in fact I don't think I've ever used the middle one.  I start sewing at the beginning of the fabric, much as I do for sewing, but as there's no backstitch it's right on the edge; often I'll use a scrap from a previous project to start in the middle of just to get things going without bunching.
This is the finished hem on the back; as you can see with the woolly nylon being untensioned it's looking really flat and professional.  Once I've finished the first piece I then continue sewing the next piece.  I do this for front, back and both sleeves.  You can do this in the round, but I find it a pain to do and always seem to have problems with finishing the ends.

At the end I sew off onto a scrap piece of fabric, I then cut the threads between the t-shirt and the scrap.   I then leave the scrap under the foot for the next start.
My next step after separating all the pieces from eachother is to cut a piece of twill tape (you can use clear elastic if you prefer).  I cut it to the size of the shoulder seam; this lends stability so the shoulder won't stretch out of shape with wear.  Most RTW garments have this touch too.
Making sure the tape, front and back shoulder seam are even, and right sides together get ready to stitch.  You could pin it, but for such a short and straight seam I don't bother.  That and when using my overlocker the less pins the better.
Start overlocking.   If using your sewing machine for this you'll need to use the machine's overlocking stitch; or failing that stretch or zig-zag will also work.
Whoops, the twill tape moved towards the blades a bit here, however it will still do it's job and the fabric did not move so all is well.
Here you can see both shoulders are sewn and we're marking centre back and centre front with pins.   We will then match those pins and put the edges of the neckline together until we reach the side quarter marks; this is not the shoulder seams.  The back-neck is actually shorter than the front, so we want the exact halfway point.
see, pins together on top of eachother
and you can see as the fabric moves along the halfway point is onto the front, past the shoulder seam.  Mark this with a pin too.  Do the same on the other side; you now have 4 pins in your neckline dividing it into quarters.
Now it is time to get our neck facing ready.  Mine is cut from the same fabric as the t-shirt and is slightly smaller than the neckline on the main pattern.   I'm folding it in half with the short ends together, right sides facing eachother and this is where I use my sewing machine for the first time to sew a 1/4" seam.   This won't see any real stretch so I'm using straight stitch.   Can you see more permanent marker?   I love that stuff!  On this machine the marker is covered with clear nail varnish to stop it wearing off the enamel paint.
I am now folding the neck facing wrong sides together and putting the first pin at the seam; this is the centre back.  I will find the centre front by putting that pin on the left, folding it at that point and flattening it; the far right will be the centre front.
Now, just like on the t-shirt I'm putting those 2 pins one on top of the other and the far edges are the other 2 quarter marks.  Place a pin on each.
Here we are with 4 pins; doesn't look like much at the moment, but....
Now we match the pins on the binding to the pins on the garment; be very careful to make sure that your seam on the binding is matched to the centre back; I've done it wrong once and I don't recommend it unless you like undoing sewing; I don't, lol.
Here, I am sewing the binding to the neckline from the right side of the garment.   I start near the centre back, and as I go I stretch the binding slightly so it fits the neckline of the t-shirt.  You don't want to stretch the neckline as you'll end up with a wavy look; best to go slow on this.  Also make sure to remove pins before they get near the blade; use your fingers on that point as a temporary pin.   If a pin goes under the blade at best you'll blunt your blade; at worst you could injure yourself, or put out the timing on your machine.   Both are expensive to fix, and damage to either could be permanent; so instead lets just be careful.
Once I've finished the neckline I like to pull the overlocking tails through the seam to secure them.  I use a tool which is made from a knitting machine hook; this one is fairly fine.   The main one I use has a dowel handle, but I couldn't find it for this picture.   You can just thread them onto a darning needle and pull them through that way.
  If you wanted to you could use your coverhem to make the seam lie flat, but I've never found it to be a problem when I'm wearing them.   Now look at that, a nice smooth neckline all finished; that's the hardest bit over in my opinion.
Now for the sleeves; most patterns you'll find the sleeve will have 2 notches.  One for the shoulder seam placement and the other will be echoed on the main garment.   You can see here I'm pointing at them; if you don't match them the sleeve won't sit correctly.   Some patterns are drafted in such a way that the sleeve is the same both sides; Kwik Sew is one that does this; I find a sleeve like the one above tends to fit better.  Match those notches, and make sure you have right sides together.   If you find that your right sides are together but the notches are on opposite sides of the garment, then swap your sleeves to the other side; you've got the left sleeve on the right side of the garment, or vice-versa.
You can see here the 3 pins I use.  One at the side seam, one at the shoulder seam, and one at the notch.
Making sure your raw edges stay together and if need be slightly stretching to fit, carefully sew around the sleeve seam, removing pins before you get to them again; make sure all notches are in the right places.
There, nice smooth seam.   Best part, you're almost done!
For the side seam I don't pin at all, I match the 2 sleeve hems together, and overlock down the side, also matching the underarm seams together; the internal corner is the only tricky bit as you go around that underarm seam.  As you approach it, straighten the two edges, the fabric will form a bubble to the left,  but should be flat and go through the machine nicely at the edge.
Keep going, hold the bottom hems together, if need be put slight tension on to keep both sides even.   I do this right from the beginning so don't normally have any seam movement and my edges are more often than not even.  As you did for the neckline, pull the overlocking ends into the overlocking seams, and you're done!
Isn't it lovely?  It sits better on me, cos unlike Bonnie here I don't have gaps in my middle.  I think I might possibly have to use some batting to fix that problem.
I've started eating raw garlic; I apologise for any odour, but it's part of the campaign to get my bowel back on my side.  Garlic kills the bad guys, but leaves the good guys alone; I will still have to repopulate, but going by the reaction so far I think it's working, but although I'm going to the loo a few times it's still much better than the normal IBS version.   I figure that's my system chucking out the bugs that last nights half clove killed off.   Last night I swallowed half a clove in one piece with milk.   After a little research today I went looking for salsa and failed to find it; instead I'm using a dried tomato and parmesan dip (which is yummy!).  I've taken probably half of the garlic so far and I'm going to stop there as it was a big bit and I don't want to go too fast.

Blog Archive